This guide is intended for those with at least a basic understanding of Wwise and will provide the steps (and a bit more) to get your sound design into the game.
To start, work your way through the projects lessons (*1) and once you have completed the lesson Enemies, Part 2: Dynamic Observers, instead of moving onto the audio tutorial follow this guide.
Step 1.
Integrating Wwise into the Unity project. Download the wwise launcher (*2). > Launch it.
In the wwise tab install wwise version 2019.1.2.8.7432 > Include the SDK to be downloaded and select windows & mac as platforms. > Select any plugins you want wwise to have.
In the wwise launcher select the unity tab. And integrate wwise into project. > SDK path should appear, if it doesn’t you may be asked to modify your wwise project. For project path select new project.
Once successful you can open unity and the wwise project through the unity tab in the wwise launcher. You will see the Wwise picker tab has been added to unity and an AK Audio Listener has been added to the main Camera.
In wwise go to Layouts > soundbank (F7) > select new and create a soundbank. > Include them for add with the tick boxes. As well as the platorm and language.> Save.
In Unity, select the WwiseGlobal game object in the Hierarchy. In the inspector > add component > scroll down to wwise and select AkBank. When the component appears select the soundbank you have created in wwise.
Back in wwise create a looping test SFX (I just used a wwise sine for this test) in positioning select 3D Spatialization to Posi\on + Orientation & give it the default custom accentuation. > Edit and set the max distance to 10 > Create a play event. Back on the Soundbank page select the bank you created. Drag your test event into the banks Hierarchy Inclusion. > Generate All. > Save.
In Unity select the wwise picker and generate sound banks from the button on the right-hand side. Your event will appear in the default work unit.
In the Unity Hierarchy create a 3D object > cube. Move the cube to the position of the shower. With the cube selected de select the mesh render and add a wwise event component. Add the rigid body that the alert pops up for and in the event field select or drag in your test event. Save.
Play the game and as you walk towards the shower you will hear your test event playing.You have now integrated wwise into unity, created, populated and generated a soundbank with a test event and got it to play in game. Step one done.
For this small project you will only need one Soundbank so moving forward you can add every event you make to this one.
Step 2. Footstep Audio.
In Unity select the John@Walk anima\on in the Assets> Anima\on folder.
In the inspector select Animation. Expand the events drop down and move the timeline in the animation preview window to when Johns right foot touches the floor (Roughly frame 15) and create event. Name it “Footstep” do the same for when his left foot touches the floor (Roughly frame 35). Apply & Save. (feel free to separate L/R)
Repeat this process for any other events you want to trigger with the animation. I have added “WalkFoley” events on frames 5 & 20.
Select your JohnLemon Character in the Hierarchy> Add a wwise AK Game Obj component.> Save.
In Wwise add a switch container with three random containers for carpet, tile & wood.
In game syncs create a footstep switch group with three switches, carpet, tile & wood.
In the general settings of your switch container. Select your newly made switch group and set the default to wood. Populate the assigned objects with your three random containers. It should look something like this.
Populate your random containers with SFX for footsteps & create a footstep play even from the switch container. Once this is done add the event to your sound bank > Generate all > Save.
Now when you play your game in unity nothing will have changed. We still have two more steps.
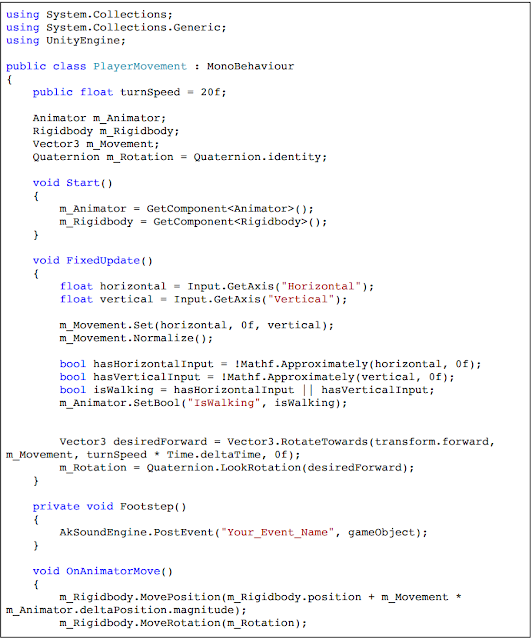
Open the “PlayerMovement” Script. In here we are going to use the events on the animation to tell wwise to play our footstep SFX.
Above the void OnAnimatorMove() section we are going to add the below, remember to replace the event name with your own event in the script > Save.
What this means is, every time unity calls an event called Footstep on the model with the animation event, the AK event is triggered.
You can add further private voids for other animation triggered events such as the Foley. Just place them below the one we have just added.
Your PlayerMovement script will now look like this.
Play the game and you will hear your footsteps! If you have done it right you will be hearing the wood footstep no matter where you go, that’s fine the wood is set as default and we haven’t told a wwise we want to switch just yet.
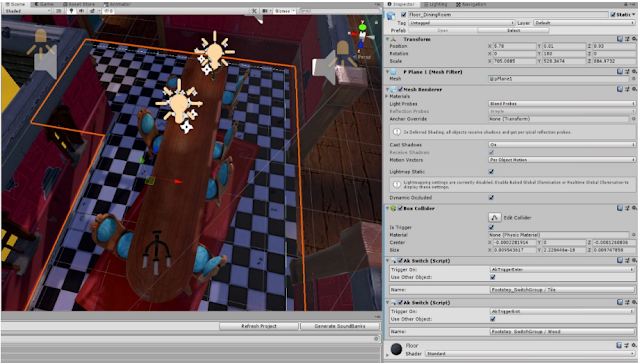
In the scene select one of the small blue rugs. Once selected you can open the prefab from the inspector. Now we are editing the prefab any changes we make to this will apply to all rugs in the game. Add a box collider component. We need it to be slightly smaller than the rug so edit the collider. On the box collider enable is trigger. Add a component > Wwise > Ak Switch. Repeat this so you have two Ak Switch components.
Both your Ak Switch components will by default be set to Trigger On: Start. Select the drop-down menu and first select nothing and then one set to Ak trigger enter and the other on Ak trigger exit. Also select the Use Other Object tick box. For the enter switch select your carpet switch group. For the exit select your wood switch group. Save your prefab and exit the prefab editor. Save.
Do the same for the “Rug_Diningroom” asset but as this is in the dining room select the exit material to be tile. Finally, do the same for all the tiled surfaces. These are not prefabs but we are able to add the same components to them in the scene view. Select the Floor_Bathroom and then Floor_DiningRoom. Add a box collider just inside the edges and repeat the steps above but selecting tile as your Ak trigger enter switchgroup > Save.
Play the game and test your footsteps. You might want to adjust the size of your box colliders.
So far we have gone over how to get a sound to play in the level, the test event we put in near the shower. And how to get sounds to play on animation events. With this knowledge you should now be able to duplicate the test emitter for the lights prefab and change the test to be a shower SFX. You can also duplicate the work we did on the animation events for Johns idle animation if you wish.
Step 3. Enemy Audio.
There are a couple ways to get SFX to play on the Ghost prefab. We could place a looping SFX on the ghost itself. But if you wanted to again attach it to the animation we need to create a very simple script and attach it to the ghost prefab. I prefer to do it this way to have more control and variety over the SFX that is played.
In the script folder> create new script “GhostSFX” > Enter the below.
Create your ghost SFX with 3D Spatialization to Posi\on + Orientation and an attenuation (your preference though some sort of cone attenuation works well here) and create a play event. Add the event to the bank and generate all.On the Ghost@Walk anima\on create an event called GhostVox on the first frame.> Apply > Save.
Repeat these steps for any SFX you wish to add to the gargoyle anima\on. Create a new script, Wwise events and anima\on events to suite. Keep in mind that every \me this event is called the SFX event will play so for the ghost your SFX would be best placed to be the length of the anima\on.
When you play the game back now it may sound a little hectic. This is because we are hearing all of the enemies in the level regardless of their posi\on. There’s a few things we can do here, You may want to explore the advanced settings in wwise to limit playback instances or/and set smaller attenuations. If you are happy with how things are sounding, great! Don’t worry about the next sec\on on changing the position of the listener.
Step 4. Moving the listener
As the Main camera has the audio listener, we hear everything dependent on how close the game object emitting the SFX is to the camera. This is fine and can be made to work ok but there is something very simple we can do to make the enemies closer to John more of a threat. Remove the audio listener from the main camera > select the John Lemmon character > Create empty and name it “Listener” make sure the listener game object is a child of the character and in it add a wwise audio listener component in the inspector. This certainly makes the enemies closest to John the threat but annoyingly, it also rotates as john rotates. This is a really, really easy fix.
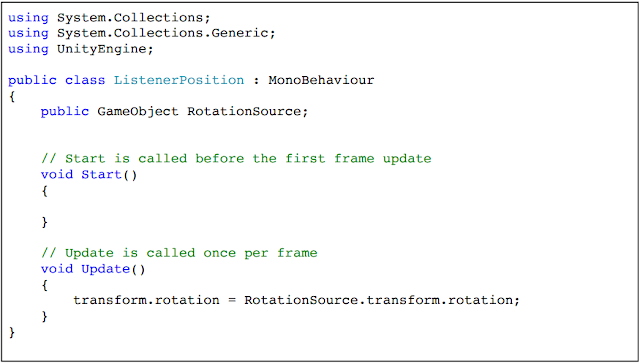
Create new C# Script “ListenerPosition” (Got to thank Bjorn Jacobson for this script)
Once created, add this script to the listener game object that houses the audio listener. The line public GameObject RotationSource; will create a box where you can drag in your main camera.
What this very simple code does is tells the listener game object to take its rotation information from the object in the box, the main camera in this case and not the parent object.
Now we have moved the audio listener onto the player your attenuations will need amending. As a guide, a distance of 4m is good for the ghosts.
You now have a lot of the basics set up. Next, we will set up basic reverb zones, atmos, the grandfather clock and finally adding pickups and Music.
Step 5. Reverb.
Setting up reverb zones could not be easier.
If you wanted to do it simply just create one auxiliary bus and one area from the following steps. But for a little more detail you can create 4 as detailed below.
First in wwise, select your Master Audio Bus. Create 4 auxiliary bus’s. One for each type of room. Bath, Bed, Dining and Hallways. Once set up, select the effect tab and add a Wwise RoomVerb or a verb of your choosing to each one.> Generate > Save.
In your Parent Actor mixers make sure “Use game-defined aux sends” is checked. Any sound you want to have the reverb effect should have this. If there is something you don’t wish to have reverb applied to uncheck this box.
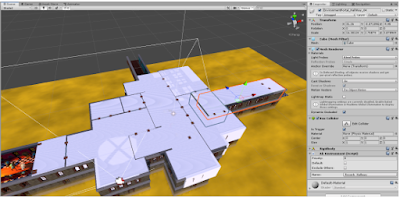
Now in Unity, add a cube to the level, make it the same size as the bathroom. Ensure the “is Trigger” box is checked on the box collider. Now he inspector of the cube add a wwise AK Environment component. Select the bathroom reverb you have created. (If you can’t select it insure you generate and save your wwise project.
Repeat the steps until every room has a cube covering it and an AK Environment component on it.
Now remove the Mesh Render Checkbox on each cube. Any sound playing in those rooms will now be affected by the reverbs. To test this, turn the bathroom up to 12 and walk in there.
Step 6. Atmos.
For the atmos there are many things you can do. I found that adding the main atmos bed to the listener and then having emitters (Like the shower) dotted throughout the level as sweeteners was a good way to go, sweeteners give the level some progression, wood creaks, wolves and wind all dotted about change the level as the player progresses.
Step 7. Collision based SFX
As the player walks past the grandfather clock, we are going to add a chime. We again need to add a cube with “is Trigger” on the box collider. Place this box where you want the chime to be triggered. Now give the cube its own tag. In the inspector you will see tag, drop this down and select add tag. Use the + option to create a new tag, call it “Clock” while we are here, create another tag “Book” (This is for later). Return to your cube and assign the tag. We will now add a simple script and attach it to John Lemon which will play an SFX when he collides with an object with the tag clock. Create new C# Script > “Interactions”. Add the following.
In the Void OnTriggerEnter, you can see that if the game object the script is attached to collides with a game object with the tag “Clock” it will first post the event you have added and then it will destroy the game object it collided with. Destroying the game object is a good way to make sure it can only happen once. Remember to replace the event name with your own event.
Step 7. Book pick ups.
As a sound designer the game is fairly limited at the moment so we will add a few books throughout the level which will work in the same way as the grandfather clock collision based SFX.
In Unity, next to the scene tab you will see the asset store. Select this and search for VIS Games Books. Import this free asset into your project. You will see a folder named Book has been added in the assets. Drag a prefab into the level. If its not visible you may need to tick the inclusion check box in the inspector. Once you are happy with its size, add the tag book that we made earlier to it. To make it appear more like a pick up we are going to make it spin. Create new c# script. SpinScript.
Attach this to the book in your level, once attached you will be able to manually input a speed for it to rotate.
We are going to edit a script we made earlier to include an ac\on on the book prefab we have added. Open the Interactions script. Add the following below our previously set up clock trigger.
This again works in the same way, when our character collides with an object with the tag book a sound will play and it will destroy the object.
Step 8. Simple Music.
Once you have your music playlist container set up in wwise and your music events in the soundbank, head into Unity. To place the music into the level add an empty game object to the scene in the hierarchy and drag the music event to the new game objects inspector. Its location in the level is not important. We don’t want the music to be environment aware so uncheck that box on the Ak Game Obj component that has been added. When you play the game you will now hear your music. How you transition between your music (if that’s the direction you want to go) is up to you.
Step 9. Getting caught/ Winning.
The final step is triggering your SFX for when John gets caught. This is a great way to reset all SFX as when you get caught in game it just starts over again and the sounds will double up. Create a caught event which will play the SFX/ music transition you want when John gets caught.
In this event add the level SFX that you don’t want to double up when the level restarts and set them to stop (global).
In Unity open the ghost prefab and select the point of view game object. We are going to add a tag to this, let's call it caught.> save.
Do this for the gargoyle too.
Open the Interactions script again. It would be good practice to separate this and create a new script but for this simple game adding our new code to this script works fine. Add the below under the book pick up sec\on and save. This \me we are not destroying the object with the tag caught as we want it to be there in the next play through.
You can either add the tag caught to the exit box or you can create a new tag following the steps above to make it a different transition.
And that is it! I hope this has helped.
Pete
(1) Wwise & John Lemon's Haunted Jaunt hcps://learn.unity.com/project/john-lemon-s-haunted-jaunt-3d-beginner?uv=2019.4
(2) Wwise Launcher. hcps://www.audiokine\c.com/download/


Comments
Post a Comment